Environmentally Conscious and Economically Sound Machine Dismantling Forum > Milwaukee
> Modern Stuff
> Computer Controlled Machinery
> Laserline 10-foot directreading laserrod GR1000/GR1000T
Laserline 10-foot directreading laserrod GR1000/GR1000T
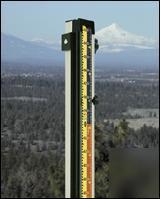
LaserLine 10-Foot Direct Reading Laser Rod GR1000 or GR1000T
GR1000=Tenth,plus cut/fill GR1000T=Tenth LaserLine 10-Foot Direct Reading Laser Rod
Collapses to 5.8' and extends to 10'. Great when using Laser Levels, this Direct Reading Laser Rod can help with quickly taking measurements, and increase your accuracy. Image is shown with true elevation plus cut and fill tape.
* Detector rail is black, high-density, UV-stabilized for long life. Specifically designed to not become brittle when exposed to ultraviolet rays or direct sunlight.
For more specs please go to
1. Set rod foot on the elevation you wish to use as your reference; i.e. finish grade, subgrade, etc.
2. Run laser receiver up or down the side of the rod and / or raise or lower front rod section until you get the "on grade" signal on your laser detector.
3. Loosen the tape lock pin (lower knob) and disengage the tape lock pin from the tape grommet.
4. Roll the tape until the laser detector pointer is at zero (between the blue and red sections).
5. Lock the tape by engaging the tape lock pin into the closest grommet, then tighten the knob.
6. To determine the amount of cut or fill at any location within the range of your laser, set the rod down and find the "on grade" signal with your laser detector. Read across from the detector pointer and the tape will tell you how much to cut or fill.
"BLUE" section 1.75 feet. Existing grade is too LOW.
FILL 1.75 feet to get up to grade.
"RED" section .80 of a foot. Existing grade is too HIGH.
CUT .80 of a foot to get down to grade.
HOW TO READ TRUE DIRECTION ELEVATION ROD
1. Set rod foot on a benchmark or hub with a known elevation; i.e. 2,525.25 elevation.
2. Run the laser receiver up or down the side of the rod and / or raise or lower front rod section until you get the "on grade" signal on your laser detector. If you are using an optical instrument, site to the rod and use the horizontal line as your grade reference.
3. Loosen the tape lock pin (lower knob) and disengage the tape pin from the grommet.
4. Roll the tape face until 5.25 is across from the pointer on the laser detector bracket, or the horizontal line on your optical instrument. You are using the last whole number and the decimal numbers of 2,525.25.
5. Lock the tape by engaging the tape lock pin into the nearest grommet. Then tighten the knob. You have now locked into the rod elevation (2,525.25). All future readings will be true elevation above or below 2,525.25 (5.25).
6. To find an elevation, simply set the rod foot at any location on the job within the range of your laser or optical instrument. Run the detector and / or front rod section up or down until you pick up the "on grade" signal from your detector. Read the number opposite the pointer. That number is your true elevation. If using an optical instrument, just read the number across the horizontal line. That number is your true elevation.
Rod reading is 6.10 = 2,526.10 true elevation
Rod reading is 8.32 = 2,528.32 true elevation
Rod reading is 4.70 = 2,524.70 true elevation
When purchasing please specify mdl. no. (GR1000 or GR1000T)
Thank you for looking! Enjoy your shpping!